Homecoming
Is this thing on? Hello?
Yeah, I know. I’ve been very absent from this blog. I have not been writing on a consistent schedule (so much for goals). However, I have been writing a lot. I’ve been writing a business plan. Then rewriting the business plan. Over and over again.
The result of that business plan is a brewery coming to Newark, OH. My wife and I are opening Trek Brewing Company. We’ve decided to follow the dream that many homebrewers have at some point while they are watching their fermenter bubble. Trek will be a brewery and taproom with a 15BBL brewhouse.
Starting a brewery keeps you busy, especially when you are still working your day job. Currently, we are doing demo in the kitchen of the former restaurant that will become the brewery. Construction will start soon to prepare the space to receive the 15BBL brewhouse and let us start cranking out some delicious beer. We are sourcing suppliers, running an Indiegogo campaign (shameless plug), developing more recipes, and continuing to learn everything that goes into running a business.
So why am I writing here again with all this happening?
I’ve seen while away that people are still getting use out of some of my posts. My current electric brewery system is getting an upgrade to 1BBL. I have some upgrades for that to share. I have some upgraded electrical to do and I’ll be playing with a glycol setup for the future 1BBL fermenters. I have some other projects in mind that will make their way onto the pages here, as well.
For now, back to the demo!
Preparing the Barrel
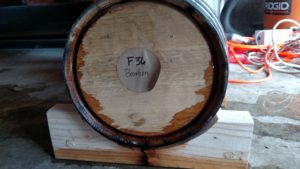
When I received the barrel it came with simple instructions: “Fill the barrel with boiling water for three hours, drain, and fill with beer.” That was easier said than done. I added water and watched it drain out all over my garage floor.
I received the barrel 4 months before I was able to fill it. Plenty of time for the staves to dry out. That doesn’t include how long it was empty prior to the barrel being sold. So now I have a dry leaky barrel that can’t fill with beer.
So I decided to try to force the barrel to be filled. The hot water should swell the staves. I boiled water and continued to attempt to fill the barrel to the top. The leaking continually slowed but did not stop over the following 24 hours. I was topping off the barrel at least every 2-3 hours except overnight.
The other thing I was trying was tapping on problem staves with a mallet. This was another solution that the internets taught me. How well this worked is unknown. But it did help me feel better as I smacked the barrel that would not let me put beer in it. I was nervous about hitting it too hard so I’m not sure if I did any real good with the mallet.
So I’m 24 hours in to trying to fill the barrel and I can’t stop the leak. The internet has not been helpful and I’m reduced to putting random words together that are related to barrels to try to find something to help me stop the leak. Finally I came across an article from WineMaker magazine. It contained tips for new barrels and used barrels and at least gave me something new to try.
The new technique consisted of filling the barrel about 20% full with hot, steamy water, shaking the barrel to get the steam to penetrate the staves, and setting the barrel on its end to swell the head of the barrel. Repeat for the other barrel head. If that doesn’t work then soak the barrel.
I was already soaking the barrel with only limited success so it seemed foolish not to try it. Before I could do this I needed to empty the barrel. The leak was slowing at this point so the barrel still contained about 2 gallons of water. As I emptied the barrel my garage immediately smelled like bourbon. All of this soaking was stripping the barrel of some of its bourbon character.
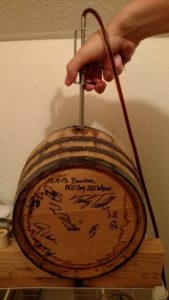
Thankfully this new technique finally sealed the barrel. I tested it again by filling it with water. Finally I could drain the barrel and fill it with beer! I had the Russian imperial stout ready in a keg and used my Blichmann beer gun to fill the barrel gently. Being in the barrel would introduce enough oxygen. I wanted to add the beer gently so I did not make the oxygen impact more dramatic.
So if I had to do it over again I would do the following for barrel prep:
- Partial fill with hot, steamy water. Shake the barrel. Set on barrel head. Repeat for opposite head.
- Overnight soak with hot water if needed.
- For obvious gaps or large leaks in the staves try tapping the staves or bands with a rubber mallet.
Now the wait has begun. I lost some of my barrel character through long hot water soaks, but I’m confident that I will still end up with a delicious beer. If anything this may have made the barrel aging process less stressful. I was worried that with the small barrel size it could impart too quickly and become overbearing. After this ordeal I am going to relax and enjoy what the barrel brings.
How to Build a Barrel Stand
My wife surprised me with a 2.5-gallon barrel for my birthday. I have never had a barrel before so my mind started racing with all kinds of questions. How do I clean it? Will it leak? Do I have beer to put in it? What beer should I brew for it? How long should the beer be in the barrel? How many times could I use it before making it a sour barrel?
At some point I hit the question I needed to solve first: how is the barrel going to stay upright? I need some kind of stand.
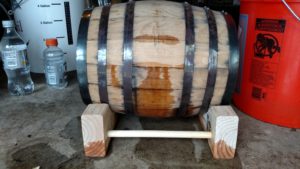
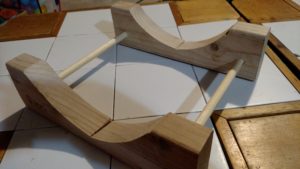
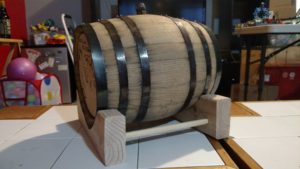
I wanted something simple and hopefully put together from scrap in my garage. The 2.5-gallon barrel is only about 1 foot long and 8 inches in diameter. A couple pieces of 2×4 and a wooden dowel should do the trick. I planned for the stand to be about 11 inches long and for about 1/3 of the barrel to sit in the stand.
I cut the 2×4 and dowel to length. I cut out a profile of the barrel in the 2×4 with exquisite craftsmanship, as seen in the above photo. I clamped the two sides together to drill the holes for the 1/2″ dowel. I wanted to make sure they were even. Once everything was cut I applied some wood glue to the dowels and hammered them in with a rubber mallet.
The stand is solid and does its job. Thankfully the barrel covers up most of my crappy workmanship. I brewed a Russian imperial stout to be the first beer in the barrel. I will go in the barrel early next week. If the first round goes well I’ll run the rest of the batch through the barrel. Then I need to figure out what is next! Now to prep the barrel…
Great Beer Down
I was long overdue for a good line cleaning. First pour out if the keezer was a little funky. I decided to just replace all of the lines and do a deep clean from the faucet to the keg connector. Friday night I took everything apart for an overnight soak in some cleaner. Saturday morning I assembled my new lines (btw, here is a great deal for some line at Amazon) and prepared to reinstall everything on the keezer after a final clean and rinse. I opened up the keezer lid and was met with a sight no brewer wants to see: kegs swimming in beer.
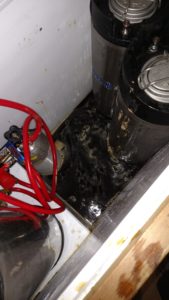 Somehow when I was removing the line I managed to loosen the beer out keg post on my keg of 1.5 year old barleywine. Foam was coming out of the base of the post when I opened it up, so I lost a nice amount of CO2 as well. The keg that I had been planning to bottle so I could get the keg back was now empty. No more beer to enjoy let alone bottle.
Of course I had a full afternoon of errands and work planned when I was now forced to clean up this mess. I removed all of the kegs and stared at all of the beer in the bottom of the keezer as a single tear rolled down my cheek. I grabbed my autosiphon and used that to pump out the beer into a bucket. After filling the bucket once the siphon was getting too much air so I lifted one end of the keezer to get the beer to pool in one corner.
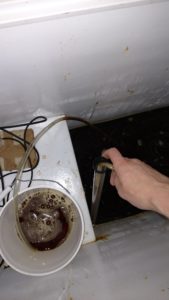 After pumping everything out I learned I had lost over two gallons of the barleywine. Sadly, I don’t have anymore in the pipeline which is a big failure on my part since this beer was brewed in December 2014. After everything was cleaned up and put back together I immediately ordered a socket that will fit on the Cornelius keg posts (Morebeer). I’ll be checking the posts of every keg I own when the socket arrives.
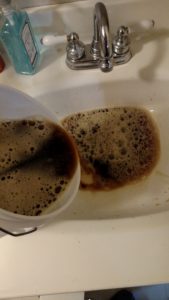 Farewell, sweet prince.
Quest for an IPA
I’m a nerd. Always have been. I’ve played video games for a couple decades and so it is easy for me to frame things in the context of gaming. In most role playing games your character is presented with various quests that progress not only the story but also the character.
In this vein, I’ve decided to start a quest series of sorts. These quests will start with a focus on beer styles and my attempts to nail down the style for myself. It may not fall exactly in a specific guideline, but I’m brewing the beer for me. I’ll be on the quest until I can complete all the steps of having the beer recipe completed (malt, hops, yeast, mash temp, etc.), and there will be a post for each iteration along the way. The first of these quests will be for an IPA.
My history with brewing an IPA has been a roller coaster of terrible to decent to needs work and everywhere in between. You’ll notice I never went above decent. One of my first batches of IPA was an attempt at a Russian River Pliney the Elder clone. That ended up just tasting like grass and had a lot of sediment in each bottle. Other attempts have been to bitter or not had enough hop character. This has been my greatest struggle as a homebrewer and is somewhat embarrassing being in the Pacific Northwest.
I’m going to start this quest from my most successful past IPA and let it evolve from there. To drive home the point again of how frustrating brewing IPAs has been, it has been two years since I’ve attempted this recipe. So I am going to brew it again as is and maybe I’ll get some improvement just from my improved processes over that time.
Recipe Specifications
--------------------------
Boil Size: 6.72 gal
Post Boil Volume: 5.72 gal
Batch Size (fermenter): 5.50 gal
Bottling Volume: 5.50 gal
Estimated OG: 1.064 SG
Estimated Color: 5.6 SRM
Estimated IBU: 80.4 IBUs
Brewhouse Efficiency: 85.00 %
Est Mash Efficiency: 85.0 %
Boil Time: 60 Minutes

Ingredients:
------------
Amt                   Name                                        %/IBU
9 lbs                 Pale Malt (2 Row) US (2.0 SRM)                 78.3 %
1 lbs                 Caramel/Crystal Malt - 10L (10.0 SRM)          8.7 %
1 lbs                 Munich Malt (9.0 SRM)                          8.7 %
8.0 oz                Cara-Pils/Dextrine (2.0 SRM)                   4.3 %
0.45 oz               Columbus (Tomahawk) [17.50 %] - Boil 60.0 min  34.8 IBUs
1.00 oz               Nugget [13.20 %] - Boil 20.0 min               19.7 IBUs
1.00 oz               Simcoe [13.70 %] - Boil 15.0 min               16.2 IBUs
1.00 oz               Nugget [13.20 %] - Boil 5.0 min                9.7 IBUs
1.00 oz               Simcoe [13.70 %] - Boil 0.0 min                0.0 IBUs
1.50 oz               Columbus (Tomahawk) [14.00 %] - Dry Hop        0.0 IBUs
1.50 oz               Simcoe [13.70 %] - Dry Hop 7.0 Days            0.0 IBUs
1.0 pkg               American Ale (Wyeast Labs #1056)

Mash Schedule: Single Infusion, Medium Body, Electric
Total Grain Weight: 11 lbs 8.0 oz
----------------------------
Name              Description                             Step Temperat Step Time
Mash In           Add 5.03 gal of water at 160.3 F        152.0 F       60 min
Mash Out          Heat to 168.0 F over 2 min              168.0 F       10 min

Sparge: Fly sparge with 3.79 gal water at 168.0 F
My goal for an IPA is a beer around 6.5% ABV with a firm bitterness and featuring citrus/tropical hop character. When this beer finishes up I’ll be able to judge it and make a change.
Chilling the Conical Fermenter
A good fermentation is critical in brewing. Temperature control is a huge part of that. When I got my conical fermenter I needed to figure out a new temperature control method. What I had for my plastic carboys is not large enough to accommodate the conical. So far I have my heating method figured out. Until now I did not need a chilling method. The ambient temperatures over winter were only required heating.
The last couple weeks have accelerated my need for a chilling solution. The outside temperatures have hit the mid 80s earlier than normal and that caused the fermenter in the garage to reach as high as 72 degrees with 5 gallons of beer inside (at least the times I was able to check it). Thankfully the beer still in the conical was just resting on some coffee beans. No harm done.
If I could set up the perfect chilling system, I would have a small glycol chiller in my garage. It would be efficient, I wouldn’t have to change ice bottles, or move the conical in and out of a chamber. Plus it would just be really cool. However, I just spent my money on a conical and a glycol unit is not cheap so that’s not going to happen.
So where does that leave me? The way I see it there are 4 paths forward:
- DIY glycol chiller
- Fermentation Chamber
- Cooler and a pump to circulate chilled water
- Only brew in the winter
Let’s look at these from worst to the winner. Clearly I’m not going to only brew in the winter. That was a dumb idea. Next.
The fermentation chamber is what I had before I got the conical. It worked really well and the reason I’m not using it now is the conical doesn’t fit. I would need to build a new chamber or buy an upright freezer/fridge to do the job. There are logistical issues to this as well. The conical with 10 gallons of beer is heavy and the only spot to put a chamber is on the opposite side of my garage. So it would require a lot of moving the conical around or pumping long distance. The logistics plus the fact that I would be buying a lot of items that could not transfer to a glycol solution later on takes this option off the table.
The DIY glycol option seems like the logical move from an actual glycol chiller. It would involve partially disassembling an air conditioner to chill glycol in a cooler. The glycol would then be pumped through the coil inside the conical. I strongly considered this option, but if the ultimate goal of the chiller is to get to the glycol chiller than I need to save money. The air conditioner is an added expense that would not translate to the glycol solution and would not be reusable after being torn apart for this use.
That leaves the cooler and chilled water option. This is essentially the DIY glycol solution but sub ice packs for the air conditioner and water for the glycol. The big point of this solution is its cheap and can be repurposed. I got all of the pieces for this for about $40. I can reuse the pump and tubing with the glycol solution and I can use the cooler for its intended purpose when I’m done with it. That lets me work towards the glycol chiller with minimal waste. The big downside of this solution is the large increase in labor. I’ll have to keep swapping ice packs to keep the water cold.
Parts List
Assembly
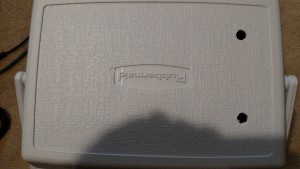
- Drill 1/2″ holes in the cooler. Drill pilot holes from the inside of the cooler. I used the grooves in the lid to align the holes with a thin portion of the lid.
- Cut tubing to length
- Attach return hose to the bottom barb of the chilling coil and secure with clamp.
- Attach hose to the pump and secure with clamp.
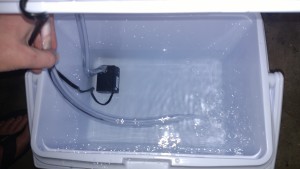
- Feed hose through cooler and attach to the top barb of the chilling coil. Secure with clamp.
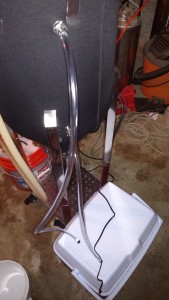
- Drink a beer
Chilling the Conical
The assembly was easy and the use is even easier. Just fill with cold water and ice packs, plug it in to a temperature controller and watch the conical stay cool. Ice packs will need to be swapped out as the chilling water warms. The power cord for the pump is small enough that it can close in the lid without additional modification.
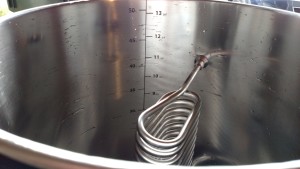
Unfortunately I have not been able to test the cooling efficiency of this setup yet. I confirmed that the pump is strong enough to move the water through the coil. The pump is running in the above picture of the inside of the cooler. It is providing a decent flow. The question now is how fast it can chill and how often the ice packs need to be swapped out. A move might need to be made to a bigger cooler for a larger thermal mass of cooling water.
I’ll have an update on how this works. I have a batch ready to go for this weekend, but the heat has subsided so I may not be able to test out the chilling system too well. The heat will return and then I’ll be able to really put it through its paces.
UPDATE: Although the ambient temperature dropped significantly, I was able to test the chilling setup when my hop screen clogged and I was forced to pour the last 2 gallons hot into the conical. After the wort temperature stabilized at 80 degrees, I filled the cooler with water and a couple ice packs and hooked it up to the temperature controller. It dropped the conical by 4 degrees in about 30 minutes. It was getting late and I needed some rest so I called it a night.
In the morning the wort was still at 72 degrees. I dropped a couple new ice packs in and it took the temp down the rest of the way pretty quickly (I forgot to time it this time). I still need to figure out how the system does managing the temperature. I hopefully won’t need to use it to drop the temperature in this fashion very often.
Vanilla Stout
Homebrewing can take up a lot of time. That time has to come from somewhere. So brewers need to keep their significant others happy to keep brewing. Thankfully I have been able to do that by making a beer. I started making this vanilla stout when I still brewed with extract. This beer has grown with me as I moved to brewing with all grain, albeit with a few changes (much to my wife’s chagrin).
Recipe Specifications
--------------------------
Boil Size: 7.10 gal
Post Boil Volume: 5.20 gal
Batch Size (fermenter): 5.00 gal
Bottling Volume: 5.00 gal
Estimated OG: 1.055 SG
Estimated Color: 31.0 SRM
Estimated IBU: 30.2 IBUs
Brewhouse Efficiency: 85.00 %
Est Mash Efficiency: 85.0 %
Boil Time: 60 Minutes

Ingredients:
------------
Amt                   Name                                                %/IBU
8 lbs                 Pale Malt (2 Row) US (2.0 SRM)                      86.5 %
12.0 oz               Roasted Barley (300.0 SRM)                          8.1 %
8.0 oz                Chocolate Malt (350.0 SRM)                          5.4 %
0.75 oz               Cluster [7.00 %] - Boil 60.0 min                    25.4 IBUs
0.75 oz               Goldings, East Kent [4.00 %] - Boil 20.0 min        4.9 IBUs
1.0 pkg               Irish Ale (Wyeast Labs #1084)
1.5  tbsp             Vanilla Extract (At packaging)


Mash Schedule: Single Infusion, Full Body, Electric
Total Grain Weight: 9 lbs 4.0 oz
----------------------------
Name              Description                             Step Temp     Step Time
Mash In           Add 4.19 gal of water at 162.2 F        154.0 F       60 min
Mash Out          Heat to 168.0 F over 2 min              168.0 F       10 min

Sparge: Fly sparge with 4.74 gal water at 168.0 F
One of the biggest changes over the years has been the vanilla extract. I’ve used less and less as the years go by. Dialing it back has allowed this to be a great beer with vanilla rather than a vanilla extract delivery system. I used to move the beer to secondary to do the extract as well. Nothing wrong with that approach, but adding it at packaging just simplifies things and its one less vessel that needs cleaning.
I’ve also been experimenting with a coffee version of this beer. Lately I’ve been making 10 gallon batches of this and splitting it to make 5 gallons with coffee. Early returns are promising using whole coffee beans, but I’ll have more on that later. The coffee really seems to take this beer to another level.
The vanilla stout has earned itself a permanent tap on my keezer. When I mess up my brew scheduling and it disappears for awhile I have to answer for that. Making 10 gallon batches certainly helps keep me out of trouble! It is my wife’s go-to beer for a good day and a bad day. Perhaps I should call this beer “Peacemaker.”
Conical Fermenter Clean in Place Solution
One of the benefits of a conical fermenter is easy access to the interior of the vessel for cleaning, and, unlike a plastic bucket, the steel does not scratch easily. While the ability to apply a little elbow grease is nice, I’m lazy and want to just let the conical clean itself. Having a clean in place (CIP) solution was one of the first things I looked into when I decided to buy a conical fermenter.
SS Brewtech has a suggestion for a CIP build. I started with this as a base and made a couple changes. First, I set it up to use quick disconnects so I could leverage the hoses I already have built for my brew system. Second, I modified the outlet. SS Brewtech recommends using 3/4 inch hose on the outlet to get enough drainage. When I made my first attempt at the CIP solution, I used 1/2 inch hose on the outlet because that’s what I could set up with what I had on hand. Why buy more if I don’t have to? I had to.
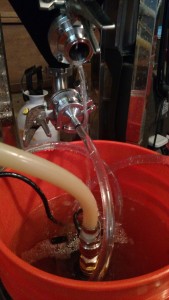 As seen in the picture above, the cleaning solution could not drain fast enough and solution was draining out of the racking arm. The pump would drain the cleaning solution reservoir in about 20 seconds. Making a switch to the 3/4 inch fitting a hose would be a purchase for something I would not use at all in the rest of my brewing setup. Part of my new mentality in the brewery is having compatibility and spares throughout my system. Instead of a 3/4 inch tri-clover fitting and hose I am using a 1.5 inch tri-clover elbow. It drains beautifully and I also use it on the outlet of the conical.
Parts List
- Submersible Pump (Amazon)
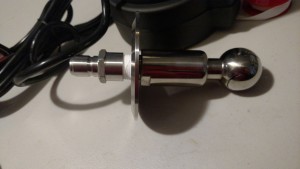
- CIP Spray Ball
- Garden Hose to 1/2″ FPT Adapter (MoreBeer)
- 1/2″ MPT to Male Quick Disconnect (MoreBeer)
- 1/2″ FPT to Male Quick Disconnect (MoreBeer)
- 1.5″ tri-clamp 90 degree elbow (MoreBeer)
- 1.5″ tri-clamp gasket (MoreBeer)
- 1.5″ tri-clamp (MoreBeer)
- 5 gallon bucket
- Teflon tape
As noted above, this setup was designed to work with the hoses that I already use with my brew system. You can set up a hose like this with:
- (2) Female quick disconnect to 1/2″ barb (MoreBeer)
- 6ft silicone tubing (1/2″ ID) (Morebeer, Amazon)
- Smooth-band hose clamps (Amazon)
Assembly
- Attach the hose to 1/2″ FPT adapter to the pump. For all of these fittings, use a few wraps of Teflon tape to ensure no leaks occur during use.
- Attach the 1/2″ MPT to male quick disconnect to the hose adapter.
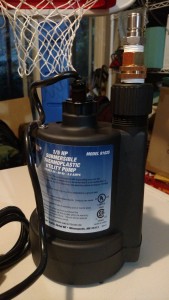
- Attach the 1/2 inch FPT male quick disconnect to the tri-clover lid.
- Attach the CIP fitting to the tri-clover lid.
- Drink a beer!
Clean in Place
Now that everything is assembled it is time to clean! Everyone’s favorite activity. After my first use of the conical I had some build up from the yeast krausen. Everything else had rinsed out nicely with the hose.
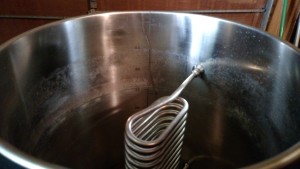 Setup and the actual cleaning is very easy. Attach the elbow to the lower outlet of the conical. Install the CIP fitting in the lid and clamp the lid down. Fill the bucket with 2 gallons of cleaning solution. I use PBW and heat it to between 130 and 150 degrees before adding it to the bucket. Hook up the hose to the pump and CIP fitting and place the pump in the bucket. Open the lower valve and the racking cane valve (to allow extra venting). Plug in the pump and let the PBW do its thing!
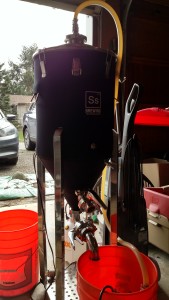
 The leg extensions from SS Brewtech make this very simple. The height of the lower port is just above the top of a 5 gallon bucket. The extensions are not necessary though. You could easily just lift the conical onto something to get the right height. I did have an issue with the tubing kinking at the top. I ended up running it through the handle on the side of the conical to give it some support.
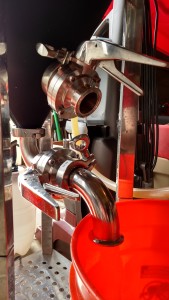
 The elbow on the outlet worked wonderfully draining back into the bucket. With the elbow I’m not sure it’s necessary to open the racking cane as SS Brewtech suggests, but it doesn’t hurt anything to have it open so I figure better safe than sorry.
 I let the pump run for about 1.5-2 hours while I took care of some other things around the house. After it was done, I filled the bucket with hot water and turned the pump back on to let it rinse out the conical for a few minutes. It cleaned very well. Happy with the set up.
First Use of the Conical Fermenter
The anticipation to brew a beer and ferment it in the conical fermenter built day-by-day once it arrived in mid-December. I decided to brew a hoppy brown ale because I needed to get something hoppy on tap at the house. It would also let me take full advantage of the conical and using the 3″ port on the lid for the dry hop (which was really nice for the dry hop and adding the yeast). Here is a rundown of the major points for the conical.
Sanitizing
I bought a cheap 1-gallon weed sprayer to use to sanitize the conical. It would be easy to spray down everything inside. If it worked. I got it pieced together on brew day and it refused to hold pressure and actually spray. So to sanitize the conical I ended up just pouring it in the top with a measuring cup and using my hands to spread it around on the walls. I ended up with a clean beer so no harm, no foul this time. I did get the sprayer working later and it was helpful in spraying out the ports to keep things clean. Moving forward it will be a really easy method.
Transferring the Wort
It is recommended for the wort to be pumped into the conical from the bottom to fill. I didn’t have the fittings for that on brew day so I just pumped it in through the top. At least until my pump got air into it and I couldn’t get it going again. I ended up dumping the last 3 gallons into the fermenter from the kettle. There were a lot of hops that went with it, but I figured that wouldn’t be a problem since I can dump out the hops and trub (more on that later). I want to get the fittings worked out for pumping in through the bottom. I think that will be a nice clean way to deal with it.
Temperature Control
In my water tests with the heating wraps, I was able to maintain 67 degrees F in the fermenter. Having an actively fermenting beer in the conical was no different. The wrap kept the brown ale where I wanted it. The temperature was cold enough in the winter that I had no need for cooling. A cooling setup is next on my list. I’ll need it soon with spring arriving. Overall, this was a pain free part of the brew.
Dumping the Trub
This was one spot that was disappointing. I could not get the trub and yeast to drop out of the fermenter. Each time I tried I could only get a little bit of hops to come out. In hindsight, I think it may have been an issue with having the blowoff tube still in the liquid. It didn’t allow for a transfer and the pressure was keeping everything static. When I finally got it to dump at the end of fermentation, the hose was no longer in the blowoff sanitizer. When it happened, there was a ton of material (hops, yeast and proteins) that came out. If you’ve ever wondered what it would look like if a robot could poop, dump thick trub out of a conical.
Transfer to the Keg
One of the reasons I got the conical was to be able to do pressurized transfers. I did purchase a second regulator to use away from the keezer, but I did not get the right fittings and hose combination put together before I had to transfer to the keg. I ended up doing a gravity transfer after getting the conical up on a low table. The transfer was fine, but I forgot to clear the racking arm before I started so I ended up with some sediment in each keg (some of the dry hop was still floating on top and kept the second keg from being clear).
When it came time to clean the conical I just sprayed it out with the hose. I was given the clean in place valve for the conical, but I am waiting on the delivery of the last few fittings for that setup so look for a post on that soon.
Overall it was a successful first beer in the conical. On my next brew I am going to be focusing on getting a good process in place for dumping the trub and yeast. That is one of the big benefits of having a conical so I need to get it figured out. I am happy with the conical so far and look forward to many more batches.
